Set up your Knox Configure account
Before you create device profiles, you need to register your resellers, add licenses and upload applications. If you are planning to enroll devices for testing purposes, use the Knox Deployment App to add test devices into Knox Configure.
The following topics listed in on this page must be completed before you customize devices with Knox Configure:
Register resellers to profile
Knox Configure enables resellers to upload device information on your behalf. You do not need to submit device information to Knox Configure. Contact your reseller to get their Reseller ID.
NOTE - If you do not have a reseller and need to locate a reseller for your region, go to: Buy from a reseller. Select your deployment Country from the drop-down menu, then select your required Knox solution. One or more Knox solutions can be selected. Registered resellers populate the screen and can be selected for their location and contacted information.

To register resellers:
- In Knox Configure, hover over your username on the upper-right corner.
- Click Manage resellers.
- Enter the Reseller ID and click Look up. Select your reseller from the list of results.
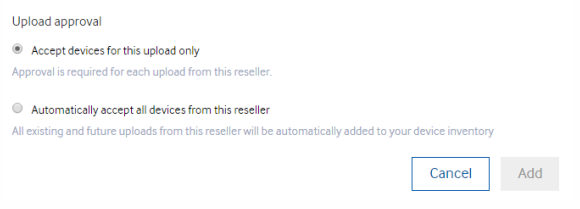
- Choose an Upload Approval.
- Accept devices for this upload only – Approval is required for each upload from this reseller.
Automatically accept all devices from this reseller – All existing and future uploads from this reseller will be automatically added to your device inventory. Choosing Automatically accept all devices from this reseller allows future device uploads to be automatically added to your profile without your explicit consent .
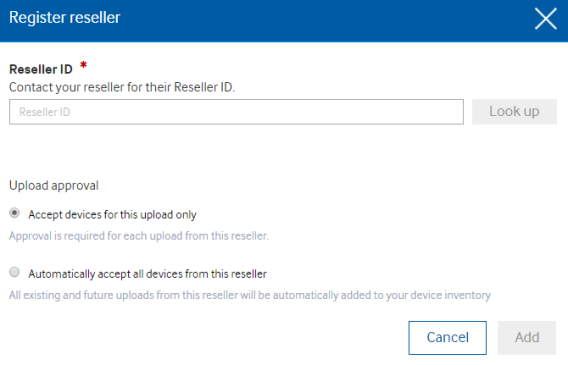
- Click Add.
- Provide your Knox Customer ID to the reseller. If you do not know your Customer ID, select Manage Resellers from the upper-right-hand of the screen or cursor over the user ID on the top right-hand side of the screen to display the Customer ID.
Manage administrators
Each account can be managed by multiple IT administrators. Additional administrators can be invited as needed.
To manage administrators:
- In the upper-right corner of the Knox Configure portal, hover over your username, and click Manage administrators.
-
Click Invite administrator and enter the following information:
- First name - Provide the first name of the administrator resource.
- Last name - Provide the last name of the administrator resource.
- Email - If this email address is not already associated with a Samsung account, the user will have to create an account before logging into Knox Configure.
-
Within the Company management field, optionally select A primary user can invite another administrator to the group to grant primary users the ability to invite and add fellow administrators to this group.
-
Select Submit when completed. The newly added administrator displays by name, with the email address displaying as a link that can be selected to update the administrators name and company management designation. If editing the administrator's profile, select Save to commit the updates.
Add devices to profile
There are 2 methods to add devices to a Knox Configure profile:
- Add devices through a reseller – A reseller uploads the devices for you.
- Add devices with the Knox Deployment app – You upload the devices manually with the Knox Deployment app.
Add devices through a reseller
Resellers can add devices to your Knox Configure account on your behalf. When a device is purchased from a reseller, they can automatically upload it to your account.
Viewing devices automatically uploaded by resellers
- In the Knox Configure portal, go to Devices > Uploads.
- If you have any pending devices, a notification appears at the top of the screen with the following message: Confirm devices from [CARRIER], A new reseller, [CARRIER], [COUNTRY] [RESELLER ID] added [#] devices to your account on [DATE}. Confirm that this is correct. Click Confirm to add these devices to your account.
- Choose an Upload Approval.
- Accept devices for this upload only – Approval is required for each upload from this reseller.
- Automatically accept all devices from this reseller – All existing and future uploads from this reseller will be automatically added to your device inventory. Choosing Automatically accept all devices from this reseller allows future uploaded devices to be added to your profile without your explicit consent.
- Click Add.
- The devices are added to your profile.
Add devices with the Knox Deployment app
You can also manually add devices to your profile with the Knox Deployment app. This app is often used for devices that were not purchased from an approved Samsung reseller. IT Admins can also use this app to enroll other devices via NFC bump.
NOTE - For Bluetooth device enrollment, customers can use the Knox Deployment App (KDA) to select a Knox Configure profile. The customer should then go to configure.samsungknox.com on the target device to enroll it. Bluetooth enrolled devices display with a BT tag within the KC portal and are treated similarly to NFC devices. A Bluetooth enrolled device displays within the DEVICES > All Devices tab.
NOTE - For information on potential issues and troubleshooting tips you may require for Google Play's Auto Install Feature, go to: Play Auto Install: Potential Problems and Workarounds.
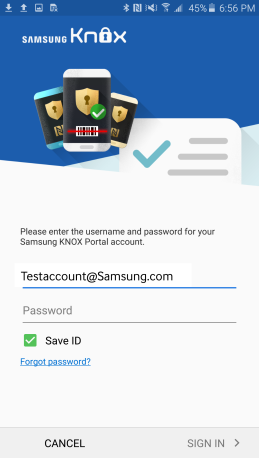
- Download the Knox Deployment app from Google Play.
- Enter your Knox Configure account credentials and tap SIGN IN.
- When the app first launches, a Get Started help menu is displayed. For the purpose of these instructions, tap SKIP.
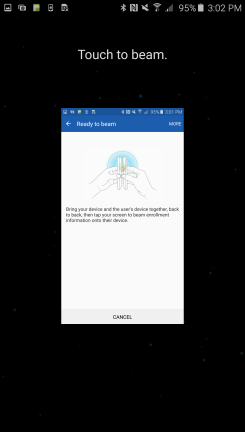
- Select ENROLL VIA NFC.
- Select the Setup edition, Dynamic edition or Dynamic edition EE profile to include with the uploaded devices and tap NEXT.

- Select a user profile to assign to the device and tap NEXT.

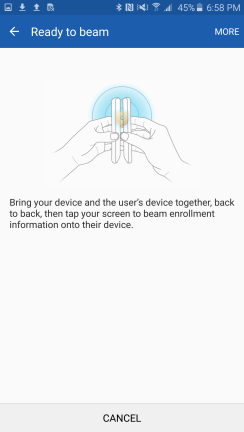
- Align your device and the users device together, back to back, then tap your screen to beam. The devices are now uploaded to your Knox Configure profile.

Add licenses to profile
To add licences using the Knox Configure portal:
NOTE - If deploying an Enterprise edition device and profile, ensure the license selected has an EE icon appended to it to ensure its Enterprise edition compatibility.
NOTE - An IT admin can now add a new KLM license (for customization APIs) prior to its actual activation date. This enables the admin to optimally register the license and assign a profile and devices before the license activation date. A pop-up warning message displays stating the activation date for the license has not yet started.
- Go to the LICENSES tab.
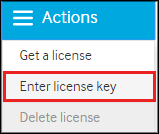
- If you don't already have a license, go to Actions > Get a license.
- To test your profiles, select Dynamic or Setup and click Get a license to generate a trial license.
- To deploy profiles to your users, click Contact sales to purchase a production license.
- If you already have a license, go to Actions > Enter license key.
- Enter the License name and License key provided by your reseller.
- Enter the License name and License key provided by your reseller.
- Enter a License name and License key. The license name must be unique to any other license name used with your specific deployment.
- Click Add.
Upload applications to profile
Uploading in-house applications is often used for internal apps that are not distributed on Google play.
Upload in-house applications
- Within the Knox Configure Portal, click the Applications tab.
- Click Actions > Add new.
- Browse for your APK file and enter a Description of the app.

- Click Upload.
Upload Google Play applications
- Within the Knox Configure Portal, click the Applications tab.
- Click Actions > Add new.
- Click on the Google Play tab.

- On a separate window or tab, search for the app on Google Play.
- Copy the app's URL and paste it in the Google Play URL field. Enter a Description if necessary.
- Click Add.
NOTE - Users will be directed to Google Play to download the apps that you've added to the Knox Configure profile.