ProKiosk mode features
Enable ProKiosk Mode to restrict a portion of a device's functionality to just a specific set of targeted applications. ProKiosk Mode is Samsung's advanced solution for transforming Samsung off-the-shelf devices into purpose-built appliances. ProKiosk Mode can restrict device operations to a single specific application or group of applications and limits unwanted device activity.
Profile information
The following sections describe how to uniquely configure a profile for devices deployed as a stationary kiosk. - For information on updating and replacing an existing device profile, go to: Updating an existing device profile.
A ProKiosk mode device remains in its ProKiosk state even after the device's profile is unassigned. Previously, when a profile was unassigned the user needed to factory reset the device using the Knox Configure Settings menu and device keys.
NOTE - The Knox Configure portal does not support these special characters (# / $ * % ^ & \ ( ) + ? { } [ ]). Ensure they are not utilized when inputting characters during Kiosk profile creation.
General information
- Knox version number — To find a device's version number, go to Settings > About device > Software info.
NOTE - The model field has been removed from the profile configuration screen. One profile can now be assigned to different model types and users do not have to create a separate profile for each intended model type.
NOTE - Enterprise edition profiles can only be supported by Enterprise edition licenses.
Profile
Set the following profile information for a ProKiosk:
- Profile name — Enter a unique profile name that has not already been used by an existing profile in your organization.
- Profile description — This field is an optional means of providing a more detailed profile description.
Additional User License Agreement
- Click Add new EULA.
- Enter the following information:
- Title
- Text
Enrollment screen
- Company name
- Address 1
- Address 2
- Support phone number
Enrollment settings
- Allow end users to cancel customization — If you don't select this option, end users cannot cancel any device configurations or customizations pushed by Knox Configure.
- Display Enrollment screen after factory reset — If you don't select this option, devices automatically re-enroll in Knox Configure after each factory reset.
- Skip setup wizard — This option bypasses an initial device setup, including Google Account creation. If the device has already been set up, this option won't remove the Google Account or any other information entered using the Setup Wizard. If you deploy Google Play apps to enrolled devices, users are required to set up a Google Account before they can download them.
Home screen & lock screen
Home activity
An IT admin can define a specific application as a kiosk's home activity. ProKiosk mode requires the device's home activity support and run at least one application, so the selection of a home activity is required.
To add a pre-installed application as a home activity:
- Select the + Add a pre-installed application option from the Home activity drop-down menu.
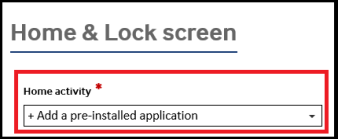
- Enter a valid package name within the resulting pop-up screen.
- Once submitted, the provided application is available for selection within the Home activity drop-down menu.
Display notification messages
- ALL — Displays all the notifications listed below.
- Hide low battery notifications — Hide the status bar message, LED light, and other low-battery related notifications.
- Hide full battery notifications — Hide the status bar message, LED light, and other fully charged related battery notifications.
- Hide Nitz set time Notification — This option hides the warning message that normally displays when the device fails to retrieve date and time information from the network. The Nitz set time notification only appears on devices that have enabled the Automatic date and time and Automatic time zone options
Status bar
- Hide status bar − Show or hide the status bar when the device is in ProKiosk Mode.
- Hide clock − Hide the clock display on the status bar when the device is in ProKiosk Mode.
- Hide system icons − Hide the display of the notification icons on the status bar when the device is in ProKiosk Mode.
- Prevent the input method from being changed.
Exit Professional Kiosk Mode UI
When the user long presses the power button, a dialog containing the option to switch off ProKiosk Mode is displayed. The default text is "In sealed mode."
You can customize this dialog in various ways:
- Professional Kiosk Mode option — Provide your own label for ProKiosk Mode.
- Professional Kiosk Mode off — Provide your own label for the option to turn off ProKiosk Mode.
- Exit passcode — End users enter this passcode to exit ProKiosk Mode. This passcode must have a minimum of 4 characters.
- Custom Professional Kiosk Mode passcode Input UI — Indicate the Package and Class name of the UI for exiting ProKiosk Mode.
Lock Screen
NOTE - A lock menu is now just available for devices configured with a dynamic edition Knox Configure profile, and is no longer available for setup edition profiles. If some target devices are currently assigned a setup edition profile, the lock menu is disabled until just dynamic edition devices are selected for update.
Hide widgets
Select the widgets to hide on the lock screen from the following options:
- Time
- Date
- Owner information
- Notifications
- Help text
- Battery information
- Shortcuts
Lock screen wallpaper
Upload a wallpaper file in PNG. The device wallpaper displays before the user correctly enters a passcode and activates the device's full functionality.
Applications & content
- Block applications from unknown sources — Prevent the user from installing apps from sources other than the Google Play store.
- Disable the usage of other applications — Enter the package names of additional applications to prevent from device utilization.
- Prevent applications from being uninstalled — Enter the package name of applications you want to prevent the user from uninstalling.
Application restrictions
Provide the package names of applications to whitelist or blacklist. Users cannot install apps that are not specified and permitted within the whitelist. This list is updated whenever the device receives a Custom Configure profile update.
NOTE - URLs must start with http://, https://, or ftp:// to be whitelisted or blacklisted successfully using an application URL restriction.
- Applications - Enter the destination of the specific applications (com.sample.packagename). The Applications field is mandatory for Kiosk and normal mode profile support.
- URL blacklist — Provide the URL(s) of the application package names excluded from a user's device. You may wish to blacklist non-enterprise apps (social media apps) to save costs.
- URL whitelist — Provide the URL(s) of the application package names allowed on a user's device. Once you set the whitelist, users can only install apps listed on the whitelist.
Content
- Select files to save in the Contents folder — Upload specific content, such as video, music, or digital books to the Content folder on the device.
- Add contacts — Upload a VCF file with contact information that you want to add to the device.
Sound & display
Sound
- Set audio level - Set the volume level of the specified stream (Media, Notifications, System, Ringtone).
- Device speaker - Set the device speaker to play all available sounds. Even if the user connects their device using an audio jack, each sound is still played through the phone or tablet's speakers.
- Ringtone - Set the ringtone or notification tone to a specified audio file.
Display
- Set screen auto rotation to OFF — Enable or disable the auto-rotate feature of the device. You could also specify the rotational angle (e.g. 0°, 90°, 180°, 270°).
- Remove lock screen — Remove the lock screen from the device. Pressing the power or home button will turn the screen on. Any previous user-configured lock screen settings such as secure pattern or device passcode unlock methods will also be removed.
- Hide system bar — Hide the status bar, navigation bar, or system bar depending on the Android system on the device.
- Set screen timeout (seconds) — Specify the inactivity period that must be exceeded to timeout the device screen.
- Screen always on when plugged in — Enable the screen to stay on when the device is connected to a power source.
- Set the default device font
- Set system font style — Set the system font to one of the following:
- Default
- Choco cooky
- Cool Jazz
- Gothic Bold
- Rosemary
- System font size — Select this option to change the size of the text displayed on devices.
- Larger font sizes — Selecting this option allows you to increase the font size above 7pt (on supported device models).
- Font size — Select a font size between 1-7pt. If you've selected the Larger font sizes option, additional font sizes may be available (on supported device models).
- Set system font style — Set the system font to one of the following:
Custom booting and shutdown animation
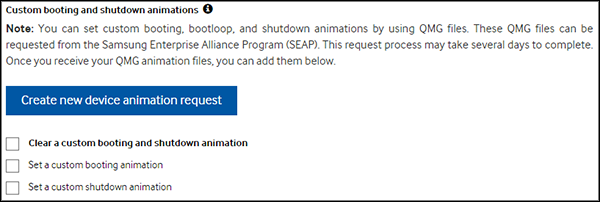
- Clear a custom booting and shutdown animation — Removes an existing device boot or shutdown animation from enrolled devices.
- Set a custom booting animation — Provide Animation, Loop, and Sound files played when the device is powered on. The Loop file plays continuously until the device has completed its boot process.
- Animation file - the animation file plays right after the "Powered by Android" screen.
- Loop file — It plays repeatedly until device has completed boot process (after the animation file is finished).
- Sound file — Submit an .ogg file played alongside the .qmg file. This file should be below 48 kHz. If your animation is silent, submit a silent .ogg file.
- Set a custom shutdown animation — Provide Animation and Sound files played as the device shuts down.
- Animation file — The animation file plays when the device is powering off. Only .qmg files are permitted.
- Sound file — Submit an .ogg file played alongside the .qmg file. This file should be below 48 kHz. If your animation is silent, submit a silent .ogg file.
Set the brightness
Use the slider to set the screen brightness. Select Set auto brightness to allow the device to automatically adjust the screen brightness according its surroundings.
Wi-Fi
- Disable Wi-Fi — Prevent the device and any apps installed on the device from connecting to a Wi-Fi network.
- Default Wi-Fi settings — Set the current device Wi-Fi configuration as the default, or leave the Wi-Fi On or Off.
- Network (optional) — Enter the SSID name and Password for the default Wi-Fi network.
- Prevent users from changing Wi-Fi On/Off settings - Keeps the Wi-Fi setting in its current mode on or off state.
- Hide notifications when open networks are detected — Prevent the device form displaying a list of nearby available Wi-Fi networks. This setting is not available if the device is utilizing Knox version 2.9 or above.
- Advanced Wi-Fi settings — Enter an SSID name and select the Security setting for this network. If applicable, enter a Password. Click Add another if you want to set up multiple Wi-Fi profiles.
Bluetooth
- Disable Bluetooth — Prevent the device and any installed apps from connecting to other devices and peripherals via Bluetooth.
- Default Bluetooth settings — Use Keep current settings to set the current device Bluetooth state as the default. Use On or Off to enforce a Bluetooth state and override current device Bluetooth settings.
GPS
- Disable GPS — Disable GPS on the device. The end user and third-party apps can’t enable GPS access.
- Default GPS setting — This turns GPS ON, OFF or keeps the current setting on the device as its default.
- Prevent user from changing GPS settings — After you have set the GPS default, end users won’t be able to change GPS settings.
NFC
- Disable NFC — Prevent the device and installed apps from communicating with other devices.
- Default NFC settings — Set the current NFC setting as the default or turn NFC On or Off by default.
- Prevent users from changing NFC settings — Prevent the user from changing the default NFC setting.
Airplane mode
- Disable Airplane mode — Prevent the user from enabling Airplane mode.
- Default Airplane mode settings — Keep current settings, turn Airplane mode On, or turn Airplane mode Off by default.
USB
- Disable USB mass storage — External storage such as a pen drive (portable USB storage), external HD, or Secure Digital (SD) card reader can’t be mounted on the device.
- Set default USB connection type — Determine the connection type when the user connects the device to a computer via USB:
- Default
- Keep current settings
- MTP — Allows the user to copy files between the device and a computer.
- PTP — Picture Transfer Protocol, the computer treats the device as a camera. Allows photo editing programs and other software apps to access photos stored on the device.
- MIDI — Musical Instrument Digital Interface, a connection type used by electronic musical instruments and computers to communicate with each other.
- CHARGING — Allow the device to charge, but not transmit data.
Device settings
- Set locale — Select the language and country for the device's regional setting.
- Time zone - Set the geographic time zone for the device's intended deployment area.
- Hide settings elements — Hide the following options from the device settings:
- All
- Bluetooth
- Location
- Wi-Fi
- Automatic Time Update — Set the device to automatically updates its time and date information from the network.
- Customize keyboard options - Selecting this option enables the Predictive mode and Keyboard settings options. Once enabled, the predictive mode and keyboard settings options function independent from one another, so there are no constraints on using these options together,
- Predictive mode - Turn predictive mode On or Off as needed. Predictive mode attempts to complete a word on behalf of the user based on the initial characters entered when forming a word.
- Keyboard settings - Either Enable or Disable keyboard functionality on the device(s) utilizing this profile.
Power
- Hide power dialog elements — Hide the following options from the dialog that appears when the user long presses the power button:
- Power off
- Restart
Disable OMC mode
Prevent the device from being customized by a source other than Knox Configure (i.e. Open Market Customization).
Auto power on/off
- Power on the device when connected to a power source — Set devices to automatically power on when connected to a power source.
- Power off the device when disconnected from a power source - Select this option to automatically power off a device when disconnected from its power source.
NOTE - The Power on the device when connected to a power source and Power off the device when disconnected from a power source options function separately from each other with no dependence on each other.
Restrictions
Security
- Disable Software Updates (Firmware updates via Wi-Fi and Mobile networks) — Prevents the device from displaying software update notifications. Even if users have enabled automatic updates, these update packages won't be downloaded to the device.
- Disable factory reset— Prevents the device user from factory resetting their own device and reverting to a factory default configuration.
- Disable device power off for users — Prevents the user from turning the device off. The device will only turn off if you disable this setting or if the battery level is critically low.
Disable hardware keys
- ALL — Turn off device hardware key functionality.
- Volume up — Turn off Volume up hardware key functionality, rendering the device incapable of increasing its volume.
- Volume down — Turn off Volume down hardware key functionality, rendering the device incapable of decreasing its volume.
APN Management
The Access Point Name (APN) is the name of the gateway between a carrier providing 2G, 3G, or 4G mobile network service for mobile devices, tablets or wearables. Devices must be configured with the correct APN details to establish connectivity. Only a single APN resource is available at one time, though an identical APN configuration with the same parameters can be defined.
Go to Actions > Add new APN to create a new profile.
General
Set as preferred APN - Select this option to make this APN the preferred Access Point resource supporting your device. This option is disabled by default.
- Name
- APN (Access Point Name)
- MCC (Mobile Country Code)
- MNC (Mobile Network Code)
- Authentication type
- None
- PAP — Password Authentication Protocol uses a static username and password for authentication purposes.
- CHAP — Challenge Authentication Protocol creates a unique "challenge phrase" for each authentication attempt instead of using a standard username or password.
- PAP or CHAP
- APN type
- Default — Used to connect to the Internet in general
- MMS — Multimedia Service
- SUPL — Stands for Secure User Plane Location, used by the device to connect to GPS services.
- DUN — Dial-Up Networking connections
- HIPRI — Indicates that apps should use the current APN settings when connecting to the Internet.
- APN Protocol
- IPv4
- IPv6
- IPv4/IPv6
- APN roaming Protocol — Specifies whether the device should use an IPv4 or IPv6 network.
MMS
- MMSC — Multimedia Messaging Service Center
- MMS Proxy
- MMS Port
- Server
- Proxy
- Port
- Username
- Password
Enterprise Billing
Enterprise Billing allows you to separate billing between enterprise apps and personal apps.
Provide the following data for Enterprise Billing support:
- Profile name
- Applications in Personal mode — Enter the package names of apps that will be used for business reasons. Your enterprise will be responsible for the data costs incurred by these apps.
- Roaming — If you allow users to connect to data while roaming, enter the following information:
- APN name
- MNC
- MCC
Summary
On the left, review the settings configured for each category. Click on the General information and Additional EULA tabs to see the information that you've entered. If you need to make any additional changes, click Back. If you've verified that the settings are correct, click Submit. Select Back to top from the lower, right-hand, side of a screen to navigate back to the top of that respective screen.