Normal mode features
Normal mode allows the device to run as a phone or tablet as intended, but with specific settings applied by Knox Configure. Normal mode provides the mots robust feature set available of all the Knox Configure profile options.
Profile Information
To date, if a device is configured and its assigned profile is changed, a profile push update is made regardless of the profile's edition (Setup or Dynamic). New rules are now in place to restrict Setup edition profiles from receiving a push update. A Dynamic profile can still push update another Dynamic edition profile, and a Setup edition profile can still push update a Dynamic edition profile. However, a Setup edition profile can no longer update another Setup edition profile, nor can a Dynamic edition profile push update a Setup edition profile.
For information on updating and replacing an existing device profile, go to: Updating an existing device profile.
NOTE - The Knox Configure portal does not support these special characters (# / $ * % ^ & \ ( ) + ? { } [ ]). Ensure they are not utilized when inputting characters during profile creation.
NOTE - A properly formatted CSV file can also be used to configure numerous devices in one bulk configuration operation. Bulk configuration operations include un-assignning profiles, device deletions, locking devices, unlocking devices, and adding tags. To bulk configure devices, navigate to DEVICES and select BULK ACTIONS. Follow the directions on the left-hand side of the screen for preparing a CSV file with one device ID per row, then upload the CSV file into the portal.
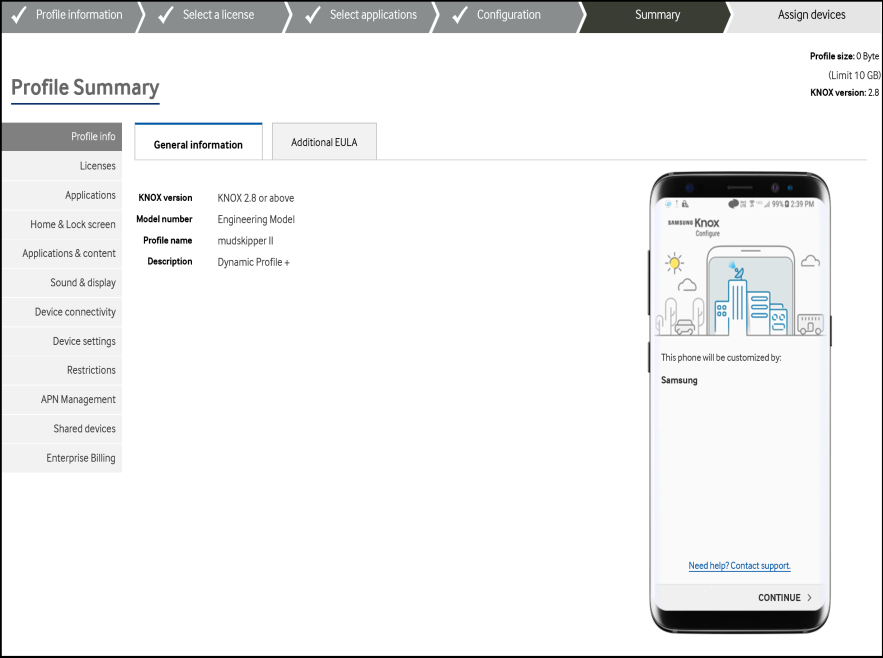
General information
- Knox version number — To find a device version number, go to Settings > About device > Software info.
NOTE - The model field has been removed from the profile configuration screen. One profile can now be assigned to different model types and users do not have to create a separate profile for each intended model type.
NOTE - Enterprise edition profiles can only be supported by devices using an Enterprise edition license.
Profile
- Profile name - Enter a unique name, not already used by an existing profile in your organization.
- Profile description - Optionally provide an additional profile description to further differentiate a profile from others with similar attributes.
Additional User License Agreement
- Click Add new EULA.
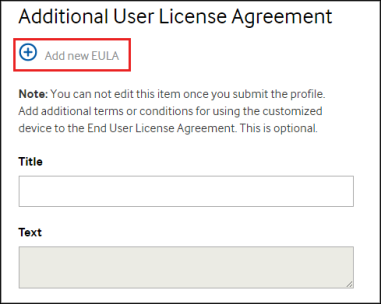
- Enter the following information:
- Title
- Text
Enrollment screen
- Company name
- Address 1
- Address 2
- Support phone number
Enrollment settings
- Skip Google, Samsung and Carrier setup screens - This option bypasses initial device setup options. When selected, ensures Android factory reset is removed and end users cannot cancel enrollment. This feature is only available on devices running Knox version 2.8 and above.
- Allow end users to cancel customization - When selected, end users can cancel configurations or customizations pushed by Knox Configure. This feature is only available on devices running Knox version 2.8 and above.
- Display Enrollment screen after factory reset - If you do not select this option, devices automatically re-enroll in Knox Configure after every factory reset.
Home & lock screen
Home screen
- Default Home screen wallpaper - Upload a file to use as the device's home screen wallpaper.
- Default Lock screen wallpaper - Upload a file to use as the device's lock screen wallpaper.
- Clear all items from the Home screen - Remove the current app icons and widgets from the device's home screen.
- Select Prevent end users from changing the Home screen and Lock screen wallpaper to ensure users can't alter their device's home screen and wallpaper.
NOTE - To optimally display widgets on a device's home screen, widget information can be extracted from the APK for "in-house" applications (non Google Play store apps). Extracted widget properties include minHeight, minWidth, minResizeWidth, minResizeHeight and resizeMode. When uploading in-house apps, a preview image is extracted and displayed.
Device
- Device type - Select Phone or Tablet.
- Position of the first screen - This is the screen displayed when the user presses the home key.
- SCREEN_0 - This is usually set as the first device screen.
- SCREEN_1 - On some devices, SCREEN_0 is reserved for default news widgets such as Daily Brief or My Magazine. In this case, set SCREEN_1 as the position of the first screen.
- Customize favorite applications — Add a row of pinned icons at the bottom of each screen. Some tablets may not support this feature.
Device screen preview
On the device simulator screens, click the + icon to add an app icon or content shortcut to that position.
NOTE - The Applications, Content, and Bookmark fields only display the files selected under the Applications & content pane. If you create a Folder, the Applications, Content, and Bookmark fields also only display the files that selected under the Applications & content pane.
Select grid — Use the drop-down menu to display phone app icons in a 4x4, 4x5 (Default), 4x6, or 5x6 grid and tablet app icons in a 6x5, 6x6, 8x4, 8x6 grid. If the device does not support the grid dimensions specified, this setting may create an error.
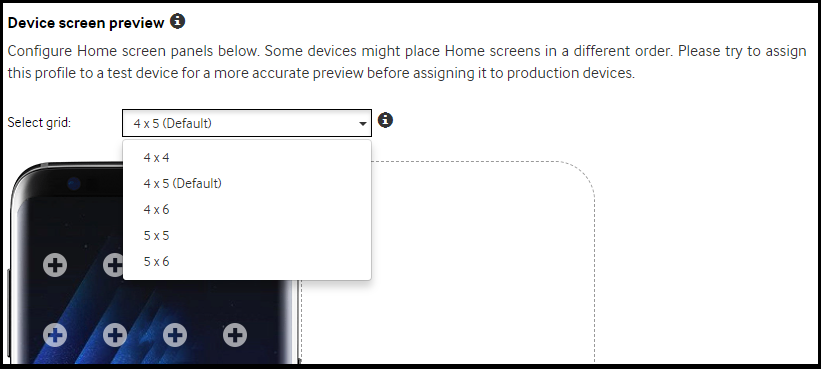
Click the + symbol next to existing screens to add more screens. Click Remove under the screens that you want to delete. You cannot delete the default screen.
Lock screen
NOTE - A lock menu is now just available for devices configured with a dynamic edition Knox Configure profile, and is no longer available for setup edition profiles. If some target devices are currently assigned a setup edition profile, the lock menu is disabled until just dynamic edition devices are selected for update.
NOTE - Device users can now make a call to the number displayed within the device's lock screen by pressing the number displayed in the lock screen. Additionally, the device cam now send an email to the email address displayed in the lock screen when they touch the email address in the lock screen. As a result, this contact information should be carefully considered.
Hide widgets
Select the widgets you want to hide on the lock screen. Options include:
- Time
- Date
- Owner information
- Notifications
- Help text
- Battery information
- Shortcuts
Applications & content
- Block applications from unknown sources - Prevents a user from installing apps from sources other than the Google Play store.
- Launch automatically after configuration - Select the content that automatically displays when the device completes enrollment.
- Nothing - No apps or other content are launched after the profile is configured and applied to the device.
- Applications - Select the applications to launch automatically once the initial profile configuration is set.
- Launch immediately on every boot-up - Select this option to launch selected applications automatically each time the device is booted.
- Other content - Select additional content, such as a sound file, to add to your profile.
- Select an application to play the file - If you have selected Other content, you need to select an application that will play the selected file.
- Launch immediately on every boot-up - Select this option to launch the selected other content automatically each time the device is booted.
- Disable system applications
- Disable all pre-installed browsers
- Disable Google Play store - Disables device from accessing the Google Play store to obtain additional applications.
- Disable S Voice - An error may occur if you enable and deploy this setting to a device that does not support S Voice.
- Disable the usage of other applications - Enter the package name(s) of those additional applications you want to disable.
- Prevent applications from being uninstalled - Enter the package name(s) of applications end users are restricted from removing.
- Change application icon - Enter the package name of an app added to the profile, and upload a custom image to use as the app's icon.
- Change application name - Enter the package name of an app added to the profile, and enter a custom name for that app.
Application restrictions
- Nothing
- Applications blacklist - Upload a CSV with the package names of apps that you want to prevent the user from installing. You may wish to blacklist non-enterprise apps (e.g. social media apps) to save on data costs.
- Applications whitelist - Upload a CSV with the package names of apps users are permitted to install. Once you set the whitelist, users can only install apps listed on the whitelist. Users cannot install apps that are not specified on the whitelist. The whitelist is updated whenever the device receives a profile update.
Browser settings
- Set the Samsung browser homepage - Enter the URL for the Samsung Browser home page.
- Add web bookmarks to the Samsung browser - Add the Title and URL of the web bookmarks for the SBrowser. If your users need to log in to an employee portal to access internal files, you may wish to add a web bookmark for that portal.
Content
- Set contents folder name - Provide a unique folder name for the repository where content from this profile is pushed.
- Select files to save in the Contents folder - Upload specific content, such as video, music, or digital books to the device's Content folder.
- Add contacts - Upload a VCF file with contact information to add to the device.
Sound & display
Sound
- Set audio level - Set the volume level of the specified stream (e.g. Media, Notifications, System, Ringtone).
- Device speaker - Set device's speaker to play all sounds. Even if the user connects their device using an audio jack, each sound is still played through the phone or tablet's speakers.
- Ringtone - Set the ringtone or notification tone to a specified audio file.
Display
- Set screen auto rotation to OFF - Enable or disable the auto-rotate feature of the device. You could also specify the rotational angle (e.g. 0°, 90°, 180°, 270°).
- Remove lock screen - Remove the lock screen from the device. Pressing the power or home button will turn the screen on. Any previous user-configured lock screen settings such as secure pattern or device passcode unlock methods will also be removed.
- Hide system bar - Hide the status bar, navigation bar, or system bar depending on the Android system on the device.
- Set screen timeout (seconds) - Specify the inactivity period that must be exceeded to timeout the device screen.
- Screen always on when plugged in - Enable the screen to stay on when the device is connected to a power source.
- Set the default device font
- Set system font style - Set the system font to one of the following:
- Default
- Choco cooky
- Cool Jazz
- Gothic Bold
- Rosemary
- System font size — Select this option to change the size of the text displayed on devices.
- Larger font sizes — Selecting this option allows you to increase the font size above 7pt (on supported device models).
- Font size — Select a font size between 1-7pt. If you've selected the Larger font sizes option, additional font sizes may be available (on supported device models).
- Set system font style - Set the system font to one of the following:
Custom booting and shutdown animation
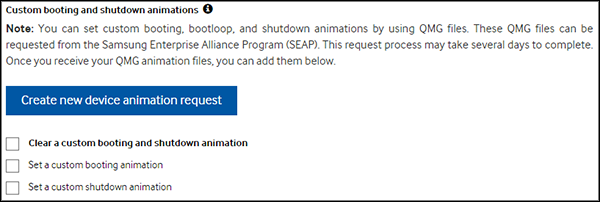
The custom display options available to phones and tablets are as follows:
- Clear a custom booting and shutdown animation - Removes an existing device boot or shutdown animation from enrolled devices.
- Set a custom booting animation - Provide Animation, Loop, and Sound files played when the device is powered on. The Loop file plays continuously until the device has completed the boot process.
- Animation file - the selected animation file plays right after the “Powered by Android” screen.
- Loop file - It plays repeatedly until device has completed boot process (after the animation file is finished).
- Sound file - Submit an .ogg file that's played alongside the .qmg file. This file should be below 48 kHz. If your animation is silent, submit a silent .ogg file.
- Set a custom shutdown animation - Provide Animation and Sound files played as the device shuts down.
- Animation file - The animation file plays when the device is powering off. Only .qmg files are permitted for phones and tablets.
- Sound file -Submit an .ogg file played alongside the .qmg file. This file should be below 48 kHz. If your animation is silent, submit a silent .ogg file.
Set the brightness
Use the slider to set the screen brightness. Select Set auto brightness to allow the device to automatically adjust the screen brightness according its surroundings.
Device connectivity
Wi-Fi
- Disable Wi-Fi - Selecting this option prevents the user and third-party apps from enabling Wi-Fi.
- Default Wi-Fi settings - Set the current device Wi-Fi configuration as the default or leave the Wi-Fi On or Off.
- Network (optional) - Enter the SSID name and Password for the default Wi-Fi network.
- Prevent users from changing the Wi-Fi on/off settings - Prevent the user from turning Wi-Fi on or off once the device has received the Knox Configure profile.
- Hide notifications when open networks are detected - Prevent the device form displaying a list of nearby available Wi-Fi networks. This setting is not available if utilizing Knox version 2.9 or above.
- Advanced Wi-Fi settings - Enter an SSID name and select the Security setting for this network. If applicable, enter a Password. Click Add another if you want to set up multiple Wi-Fi profiles.
Bluetooth
- Default Bluetooth settings - Use Keep current settings to set the current device Bluetooth state as the default. Use On or Off to enforce a Bluetooth state and override current device Bluetooth settings.
GPS
- Default GPS setting - This setting turns GPS ON, OFF or keeps the current setting on the device as the default.
NFC
- Default NFC settings - Set the current NFC setting as the default, or turn NFC On or Off by default.
Airplane mode
- Keep current settings, or turn the airplane mode On or Off.
Mobile data
- Turn on mobile data - Turn mobile data ON, OFF, or keep the current setting on the device.
Set default USB connection type
Determine the connection type when the user connects the device to a computer via USB:
- Default
- Keep current settings
- MTP - Allows the user to copy files between the device and a computer.
- PTP - Picture Transfer Protocol, the computer treats the device as a camera. Allows photo editing programs and other software apps to access photos stored on the device.
- MIDI - Musical Instrument Digital Interface, a connection type used by electronic musical instruments and computers to communicate with each other.
- CHARGING - Allow the device to charge, but not transmit data.
Enable SIM lock
Enabling the SIM pin lock prevents the use of the device's corporate SIM card on any other device. Whenever the corporate device is powered on, it automatically unlocks the device's SIM card for this session. However, if the SIM card is removed and inserted into another device, it remains locked. An IT admin can set a PIN here to unlock the SIM card for use on a different device.
SIM 1 — Select Enable from the drop-down list and enter a PIN at least 4 characters long.
SIM 2 — This option is only applicable if you are deploying Knox Configure to dual-SIM supported devices. Select Enable from the drop-down list and enter a PIN that is at least 4 characters long.
Device settings
The following are the device setting options available to phone and tablet devices:
- Locale — Select the language and country utilized for the device.
- Timezone — Keep current settings or select the appropriate timezone for devices.
- Hide Settings menu/elements — Hide the following items from the device settings menu:
- ALL
- Backup and Reset
- Bluetooth
- Developer
- Airplane mode
- Language
- Lock screen and security (Lock screen)
- Wi-Fi
- Automatic Time Update — Set the device to automatically update its time and date information from a network resource.
- Show the touch sensitivity in the quick panel — Provide an option for the user to change the touch sensitivity settings when utilizing the settings pane.
- Developer settings
- Disable USB debugging mode
- Default USB debugging mode - Turn USB debugging mode On or Off by default or use the current setting as the default.
- Disable OMC mode — Prevent the device from being customized by a source other than Knox Configure (i.e. Open Market Customization).
- Power on the device when connected to a power source — Set devices to automatically power on when connected to a power source.
- Power off the device when disconnected from a power source - Select this option to automatically power off a device when disconnected from its power source.
NOTE - The Power on the device when connected to a power source and Power off the device when disconnected from a power source options function separately from each other with no dependence on each other.
Restrictions
Device functionality
To set biometric device restrictions (facial recognition, fingerprint scanner and iris scanner) on supported models running Knox version 2.9 or higher: go to: Security settings.
- ALL — Disable all of the settings listed under Device functionality.
- Prevent end users from using the camera.
- Prevent video recording if the camera is enabled.
- Prevent end users from capturing the screen.
- Prevent end users from using the microphone.
- Prevent audio recording if the microphone is enabled.
- Prevent end users from receiving SMS
- Prevent end users from sending SMS
- Prevent end users from receiving MMS
- Prevent end users from sending MMS
- Prevent end users from using the clipboard.
- Prevent end users from accessing the Settings menu.
Disable hardware keys
- ALL - Disables all hardware key functions.
- Volume up - Turn off Volume up hardware key functionality, rendering the device incapable of increasing its volume.
- Volume down - Turn off Volume down hardware key functionality, rendering the device incapable of decreasing its volume.
- Home - Disables the device's capability of returning to the home screen.
- Power - Disables the device's power key.
Security
The following security settings enable an IT admin to restrict specific access and storage capabilities to reduce vulnerabilities. For information on disabling biometric authenticators (fingerprint scanner, iris scanner, and facial recognition) on supported device models running Knox 2.9 or higher, go to: Security settings.
- ALL - Disables all of the settings listed under Security.
- Disable USB mass storage- Prevents the device from using USB storage.
- Disable USB host storage - Either disable USB host storage in its entirety.
- Disable SD card access - Prevents the device from reading data from a SD card or writing data to a SD card.
- Disable Software Updates (Firmware updates via Wi-Fi and Mobile networks). - Prevents the device from displaying software update notifications. Even if users have enabled automatic updates, these update packages will not downloaded to the device.
- Disable factory reset- Prevents a user from factory resetting their device.
- Disable device power off for users. — Prevents the user from turning the device off. The device will only turn off if you disable this setting or if the battery level is critically low.
- Disable Multiple user mode. — Prevents more than one user account from being created.
- Disable Safe mode. — Safe mode prevents the device from running third-party apps. Select this option to prevent users from enabling Safe mode.
Roaming
- ALL — Disables all of the settings listed under Roaming.
- Prevent end users from using mobile data while roaming.
- Prevent end users from syncing while roaming.
- Prevent end users from receiving WAP push messages while roaming. — WAP messages direct users to web pages.
- Prevent end users from making voice calls while roaming.
Tethering
- ALL - Disables all of the settings listed under Tethering.
- Prevent end users from using Bluetooth tethering.
- Prevent end users from using USB tethering.
- Prevent end users from using Wi-Fi tethering.
Security settings
Refer to the Security setting screen to disable some or all of the biometric authentication settings available to supported devices. To restrict end users from using other (non biometric) device functions, go to: Restrictions.
NOTE — If enabling or disabling biometric authentication, the device's password quality will be automatically set and the device's swipe option is no longer available.
- ALL - Select All to disable fingerprint recognition, iris scanner and facial recognition device user authenticators
- Disable Fingerprint Scanner - Disables a device's ability to use its fingerprint scanner as a user authenticator option
- Disable Iris Scanner - Disables a device's ability to use its optical iris scanner as a user authenticator option
- Disable facial recognition - Disables a device's ability to use its facial recognition capability as a user authenticator option
APN Management
An Access Point Name (APN) is the gateway between a carrier providing 2G, 3G, or 4G mobile network service and the mobile device. Devices must be configured with the correct APN information to establish data connectivity. Only a single APN resource is available at one time, though an identical APN configuration with the same parameters can be defined.
General
If adding or editing an APN resource, provide the following configuration details:
Set as preferred APN - Select this option to make this APN the preferred Access Point resource supporting your device. This option is disabled by default.
- Name
- APN (Access Point Name)
- MCC (Mobile Country Code)
- MNC (Mobile Network Code)
- Authentication type
- None - No user credential validation exchanges are attempted.
- PAP - The Password Authentication Protocol (PAP) uses a static username and password for authentication purposes.
- CHAP - The Challenge Authentication Protocol (CHAP) creates a unique "challenge phrase" for each authentication attempt instead of using a standard username or password.
- PAP or CHAP
- APN Protocol
- IPv4
- IPv6
- IPv4/IPv6 - Both IPv4 and IPv6 formatted IP addresses are supported for the APN resource.
- APN roaming Protocol - Select whether the device should use an IPv4, IPv6 formatted network or both as a roaming protocol.
MMS
- MMSC
- MMS Proxy
- MMS Port
- Server
- Proxy
- Port
- Username
- Password
Shared Devices
The Shared Devices feature allows multiple users to have their own profile, apps, and files on a single device. Users can log in with Active Directory credentials. Users cannot access data and settings for other users' profiles. A shared device configuration is optional and not required for profile creation in Knox Configure.
NOTE — The configuration options within the Shared Devices screen differ if the device is utilizing Knox version 2.9 or above. If using Knox 2.9 or above, go to: Shared Device configuration for Knox 2.9 or above.
- Select Enable Shared Device to upload the shared device agent on to the device.
- Choose Select button, and upload a Background image to display for the Shared Device login screen.
- Samsung recommends the Samsung Kerberos SSO authenticator for validating shared devices. Select the Enable Kerberos SSO checkbox to upload the Samsung Kerberos Authenticator for shared device validation. Optionally use the Upload XML configuration file setting to select and upload a XML formatted file. If you do not have a properly formatted configuration file, select Click here for sample XML file to display a sample file you can use for reference.
- Set the following Enterprise branding information to set shared device organizational logos and company name branding:
- Choose the Select button and set a Company logo to display on the shared device(s). Ensure the file utilized adheres to the listed image requirements and recommended dimensions.
- Enter a Company name for shared device utilization does that not exceed the 20 character maximum.
Shared Device configuration for Knox 2.9 or above
Devices supporting Knox version 2.9 or above support additional shared device configuration options not supported in earlier Knox versions. To set a shared device configuration on devices running Knox version 2.9 or above:
- Enable the Shared Device option to upload the required shared device agent to the device. Shared Device must be enabled to set the remaining options.
- Enter the AD domain name of the corporate Active Directory provisioning shared device accounts. When powering on, shared device users receive a prompt to log in with the credentials for this Active Directory domain. A successful login is required to access shared device resources.
- Choose Select, and upload a Background image for the Shared Device login screen. The selected image overwrites the image set in the Home and Lock screen field.
- Set the following Enterprise branding information to provide shared device organizational logos and company name:
- Choose the Select button and set a Company logo for shared device branding. Ensure the file utilized adheres to the listed image requirements and recommended dimensions.
- Enter a Company name for shared device utilization does that not exceed the 20 character maximum.
- Set a Screen idle timeout (minutes) to define the maximum amount of time a shared device can remain idle before password credentials must be re-entered to resume access. The default setting is 120 minutes if left unspecified.
- Set a Maximum allowed failed lockscreen attempts threshold to limit the number of failed lockscreen attempts permitted by shared devices. The default setting is 5 attempts if left unspecified.
- Select applications to prevent data clearing to add shared device application packages that are retained, and not cleared, once shared device mode is disabled. Select Add to include additional applications, or X to remove a selected package.
- Enable Kerberos SSO to upload Samsung's recommended Kerberos authenticator to the device.
Enterprise Billing
Use Enterprise Billing to separate billing between enterprise apps and personal apps.
Provide the following information:
- Profile name
- Applications in Personal mode - Enter the package names of apps used for business. Your enterprise is responsible for data costs incurred by these business apps.
- Roaming - When allowing users to connect to data while roaming, enter the following information:
- APN name
- MNC
- MCC
Summary
On the left, review the settings configured for each category. Optionally select the General information and Additional EULA tabs to review the information entered. If you want to make any changes, click Back. Once you have verified the settings are correct, click Submit. Select Back to top from the lower, right-hand, side of a screen to navigate back to the top of that respective screen.